The Product
The Romtec Trios Hard Drive Selector (THDS) is a truly great invention
for anyone who uses a computer. What makes this piece of hardware
so great is that it provides the ability to select a hard drive, to
boot from, without having to actually open the case and switch out
hard drives and jumpers.
The THDS is a plastic unit, which fits in a 5.25-inch bay and features
three buttons on the front of it. Each button corresponds to a drive,
which when selected, sets that drive as the bootable drive, providing
the ability to switch boot drives very easily by simply powering
off the system and selecting the appropriate switch corresponding
to the drive you would like to boot from.
The best feature about the THDS, in my opinion, is that it features
dummy proof buttons, which render the front buttons useless once
the computer has been powered on. This is to prevent hard drive
mishaps in case someone attempted to select another button while
the computer was turned on. This is a great feature if you have
kids who love to go around and press buttons.
The THDS comes equipped with all the IDE and power cables needed
to connect up the Trios and three hard drives.
The uses for the THDS are virtually limitless. Just to give you
some ideas, you could set each drive to a different operating system
allowing for quick access to each for testing purposes, studying,
etc. It could be set up to allow three different users to each have
their own hard drive while still sharing one computer. This device
could be of even greater use in schools and colleges who could use
this device to support multiple classroom environments. As I said,
the possibilities are virtually limitless.
Personally, I will be using this device to run multiple operating
systems on one computer for easy access when benchmarking hardware.
Installation
Included with the Trio are 3 data cables, power and power splitter
cables, and screws.
Actual installation of the Trio is relatively simple, however,
I did run into one problem with the first case I tried to install
the Trio in. The case I was using was the type that utilized the
screwless drive rail brackets. Upon attempting to use the screwless
drive rail brackets, I quickly realized that they would not work
with the Trio. Since the Trio itself is fully composed of plastic,
it was not possible to apply the pressure needed to mount the screwless
mounting brackets into the screw-holes of the Trio without breaking
or scratching up the Trio. I quickly abandoned the idea and had
to install the Trio in another case that had drive rail brackets
that supported screws.
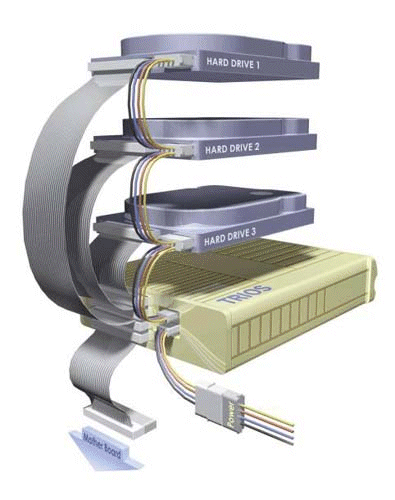
After mounting the Trio setup was simple. I simply used one of
the included IDE cables and connected the appropriate connection
to the motherboard. I then set each drive to master as instructed
and attached them with the included IDE drive cables to the remaining
three IDE connections
.
Operation of the Trios after install is also very simply. Simply
select the button of the corresponding drive from which you would
like to boot. Next, turn on the computer, and the operating system
on the selected drive will load. If you want to boot from another
drive, simply turn off the computer and select the button for another
drive.
|